Showing posts with label Recipes. Show all posts

Friday, February 28, 2014

Getting your Kids to Eat their Fruits and Vegetables

As a mother I want my children to live a healthy lifestyle. I want them to eat their fruits and vegetables. More importantly, I want them to learn to make good choices on their own. Fortunately, getting them to eat their fruit was never a problem. They crave that sweet taste and enjoy many different kinds of fruits. My daughters love vegetables, too! My son, on the other hand, will turn his head away from most of them. But, this does not stop me from putting them on his plate each day.

 Do you have this problem? I challenge you to make it a priority to include fruits and vegetables in your family's daily diets.

Serve It Up 

  • Cut up fruits and veggies for easy access. A whole pineapple or an orange sitting on the counter may easily get passed up by everyone. Do a little prep work by cutting up your fruit and vegetables when you return from the grocery store. Store them in see through containers, or snack baggies. Kids and adults can grab and go.

  • Make your fruits and veggies look delicious. My kids love when I make their fruits and vegetables into different shapes. One of my favorite ways to serve up fruits or veggies is by letting them "eat the rainbow." Offer different colors of fruits and veggies and shape them into a rainbow.

Name It

  • Make a fun name for a fruit or vegetable. Broccoli is not just broccoli for my kids. Broccoli bites are "trees," and cauliflower is the "cousin."
  • Pretend you are an animal eating your veggies. Eat carrots and lettuce for your "bunny food." 

Dip It

  • Offer some ranch dip or other dressing. I love carrots. Simple and delicious. My oldest daughter, however, will not touch them...unless I add a squirt of ranch dressing on the side.
  • Try hummus. Hummus is a favorite dip of mine. I do not buy it as often as I would like to, but I will enjoy a plateful of veggies with hummus.
  • Enjoy some fruit dip. Make an easy-peasy fruit dip by adding honey to some plain yogurt. Mix it up and get ready for some yummy dipping.

Mix it

  • Smoothies and milkshakes. Remember my post about our favorite green smoothies? Smoothies are a great way to mix in both fruits and vegetables for your children and yourself.

  • Muffins and breads. Blueberries, carrots, squash...there are plenty of delicious fruits and veggies that can be added to your favorite homemade breads. Try them in muffins, loaves, and pancakes for starters. 
  • Dinners. I do not have a problem with mixing in vegetables with some of our favorite dishes. Add shredded carrots to sloppy joes or add a layer of spinach to your lasagna. A little addition here or there may help spark their taste buds.  
If you have trouble getting your child to eat their fruits and vegetables, do not give up. They will learn to love them eventually. :)

Mix them, hide them, do whatever you have to, but keep serving them!

Friday, January 17, 2014

Delicious Green Smoothie


Some of my favorite drinks to make are smoothies. I love the taste and the health benefits from a good smoothie. The color of your smoothie will turn a bright green once you start blending in a green vegetable like spinach or kale. Personally, I prefer the taste of spinach over kale, but I still try to vary my vegetable and fruit intake. I think the frozen mixed fruit really adds to the flavor, too. Today I made my smoothie using a package of frozen mango, papaya, and strawberry fruit. Here is my own, favorite recipe that I love to make in the mornings. 

Ingredients:
1 Cup Almond Milk
1 Ripe Banana
1 Cup Fresh Spinach
1 Cup Frozen Mixed Fruit
1 Tablespoon Milled Flax Seed
1 Tablespoon Peanut Butter
1 Teaspoon ground Cinnamon


All the ingredients are approximate because I usually just throw everything in without even measuring. The great thing about homemade smoothies is that you can add in whatever you have on hand. If there is something that you don't like or you are allergic to you can omit it. Blend all ingredients together.


A smoothie is a perfect way to get in your fruits and vegetables each day. Some kids (ahem, my son) find a bunch of spinach leaves intimidating and "yucky." I am still trying to convince my six-year old boy to drink this, but he does not want to try it because it has "vegetables in it." My little boy prefers that I stick to the milk, banana, peanut butter, and cinnamon smoothie. Whatever works..at least, he is a fruit lover! On the other hand, my seven and three year-old daughters drop everything when they hear my blender running. This is one of their favorites!  My busy husband is also a fan of this smoothie, and this is a quick way to squeeze in breakfast before work.


What are your favorite add-ins to your smoothies?

Wednesday, January 1, 2014

Taco Soup


Happy New Year!! January 2014. I may have to write that a few hundred times before it sticks in my mind. I can't believe another year has passed. And, Christmas Day? I think it came and went way too quickly this year! At least we still have the rest of the winter season to enjoy. This means soups, chili, and comfort foods! I have a few favorite winter recipes, and this is one that I just had to share with you! It's super easy, delicious, and a sure crowd pleaser!

A co-worker gave this recipe to me when I was engaged to get married. I will love her forever for introducing me to this meal. The best part about making this soup is there are no fancy ingredients, and you don't have to slave over the stove all day! (But, it will taste like you did!)

Here is the super-simple recipe for Taco Soup.

Taco Soup

Ingredients


  • 1 can pinto beans
  • 1 can kidney beans
  • 1 can corn
  • 1 can Rotel
  • 1 can small black olives (sliced)
  • 1 can tomatoes (I use whole, peeled)
  • 1 lb. ground beef (browned and drained)
  • 1 package taco seasoning
  • 1 package (dry) Ranch dip mix
  • 1 cup water (more or less, depending on how soupy you want it)
Directions
  1. Combine all ingredients in a large pot.
  2. Bring to a boil.
  3. Turn heat down to low and allow it to simmer for 10-15 minutes.
  4. Serve in bowls. Top with shredded cheese, sour cream, cilantro, and/or any other desired toppings. Serve with tortilla chips.


I told you it was simple! I have doubled and tripled this recipe when I have served it for guests. This makes great leftovers, and it freezes well, too. 

Try it out, and let me know what you think! I hope it will be one that you add to your favorite recipes as well! 

Friday, December 13, 2013

Egg Nog Cookies- Recipe Swap


I was very excited to sign up for a Christmas Cookie Recipe Swap with Julie from White Lights on Wednesday. She and her co-hosts from I Love My Disorganized Life and Real Housemoms organized the swap so that cookie lovers everywhere can exchange cookie recipes online. Everyone that signed up for the swap was assigned a partner. I was partnered with a fellow blogger, Amy from Whipped. I sent her my recipe for Fudge Ecstasies and she sent me a favorite recipe for Egg Nog Cookies. I made them for the first time this week! They turned out great, and I will be making more of these this weekend for my Cookie Exchange party that I will be hosting on Sunday.

Here is the recipe for all to indulge in!

Egg Nog Cookies

Ingredients:
2 1/4 cups flour
1 tsp baking powder
1/2 tsp cinnamon
1/2 tsp nutmeg
1 1/4 cups sugar
3/4 cup SALTED butter, softened
1/2 cup eggnog
1 tsp vanilla
2 egg yolks

Directions:
  1. Preheat oven to 300 degrees.
  2. Combine flour, baking powder, cinnamon, and nutmeg in a bowl.
  3. Cream the butter and sugar together.
  4. Add in the eggnog, vanilla, and egg yolks.
  5. Mix well until smooth.
  6. Slowly add in the dry ingredients until everything is combined.
  7. Drop rounded spoonfuls onto prepared cookie sheet and bake for 20 minutes or until the bottoms turn light brown.
  8. Remove and allow to cool before frosting.


Frosting ingredients:
3 cups powdered sugar
1/4 cup UNSALTED butter, softened
1/3 cup eggnog

Directions:
  1. Beat powdered sugar and butter until combined.
  2. Slowly mix in eggnog until desired consistency is reached.
  3. Ice the cookies and sprinkle with nutmeg if desired.


Love to bake cookies for Christmas? Want to see more recipes?
Links open at 8 am Central.

Friday, November 8, 2013

My Favorite Banana Nut Bread Recipe


When I got married my sister-in-law gave me a recipe box with some of her favorite recipes. One recipe that she included was her Banana Nut Bread recipe. I tried it and for eight years it has been my go-to recipe for making banana nut bread. If you like to bake you probably have all or most of the ingredients sitting in your pantry already. This is also the recipe I keep handy when I have bananas sitting on my counter for a few days…which happens just about every week. Buying extra bananas is my excuse to indulge in my favorite Banana Nut Bread!

My Favorite Banana Nut Bread Recipe

1 ¾ cups Flour
¼ tsp. Baking Soda
2/3 cup Sugar
2 Eggs
¼ cup Vegetable oil
2 tsp. Baking Powder
½ tsp. salt
¾ cup Milk
1 cup Mashed ripe bananas (about 2 bananas)
½ cup Nuts, chopped (walnuts are great)
½ to 1 tsp. Cinnamon
Pam Nonstick Spray

Grease and dust small loaf pan.  Mix all ingredients.  Bake at 350 degrees for 45 minutes to 1 hour. If you want to make mini-muffins like I often do then bake them for about 12 minutes.


Hope you enjoy this banana nut bread and muffin recipe as much as we do!


Wednesday, October 30, 2013

Oreo Pudding Graveyard


Oreo pudding cups were always a favorite of mine when I was growing up. Nothing beats eating “dirt and worms” as a kid! Of course, I had to make it for my daughter's Halloween party for girl scouts. The original recipe that inspired my dessert can be found at http://www.kraftrecipes.com/recipes/dirt-cups-57763.aspx. I didn’t make individual cups because I wanted it to look more like a graveyard to go with the Halloween theme. This is how I made my dirt filled graveyard:

Ingredients
  • Jell-o Chocolate instant pudding and pie-filling (5.9 oz)
  • Milk (3 cups)
  • Cool-Whip, thawed (8 oz. Tub)
  • Oreos (about 15 to 20 Chocolate crème cookies), crushed and divided
  • Marshmallows (large)
  • Gummy worms and gummy skeletons
  • Black tube icing

Directions
1. Place cookies in a Ziploc bag. I used a meat mallet to crush the oreos in the baggie until they were finely crushed into crumbs.
2. Whisk pudding mix and milk together for two minutes. Let stand 5 minutes. Mix about ½ cup of crushed cookies into the Cool-Whip. Then add this cookie/Cool-Whip mixture to the pudding.
3. Pour pudding into a square or rectangular serving dish.
4. Sprinkle the remainder of crushed cookies over the pudding mixture.
5. Add tombstones, gummy skeletons and gummy worms to your “dirt” to make a graveyard scene.

The tombstones are marshmallows cut in half from top to bottom. I piped “R.I.P” in black icing on a couple of them. I added gummy worms to creep around the graveyard and skeleton gummies. I cut up one of the skeleton gummies so it could appear to have bones peeking out of the dirt.


Friday, September 27, 2013

Pumpkin Marshmallow Pops


Last month, we had a Lego party for my 6-year old son. I made cute yellow Lego-Head marshmallow pops. They were a hit with the kids and they loved the many faces I drew on them.  I started thinking about Fall and Halloween coming up. So...I decided to make pumpkin and jack-o-lantern marshmallow pops!
Want to make some of your own marshmallow pops?

      Materials
  • Wilton Candy Melts (orange)
  • Bowl for melting candy
  • Large Marshmallows
  • Cookie sticks or cake pop sticks
  • Egg carton or Styrofoam (for drying)
  • Black decorating gel and/or green icing tubes, green sprinkles (optional)
  • Chocolate morsels


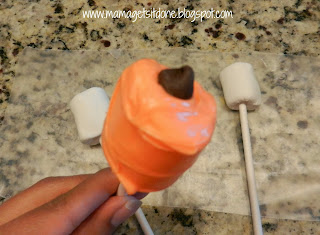
They are so easy and fun to make. First, you will need some candy melts. I used orange, but you can use white and add food coloring to it if you want a certain color.

Place marshmallows on top of cookie sticks.


Put candy melts in a microwaveable bowl. Melt the candies according to package. Mix the melted candy.


Dip marshmallows in melted candy coating. Use your spoon to smooth the coating for a finished look. Add a chocolate morsel to the top for a stem.


Stick pops in Styrofoam or egg carton to dry. (I poked holes at the top of the egg carton so the sticks would stand up straight and not touch the other pops.)

When the marshmallow pops are dry you can add candy embellishments or icing. Pipe a jack-o-lantern face with black decorating gel if you wish. I also added green sprinkles to the top for leaves. 


Enjoy these yummy and cute treats anytime!


Make pumpkin marshmallow pops