Wednesday, November 13, 2013

How to Dye Pasta and Use with Children's Activities


I like to dye pasta of all shapes and sizes to make fun kid’s projects. The best part about colored pasta is it is cheap and easy to make. All you need are a few things you probably already have around the house.

Materials


  • Different Shaped Pasta (I used Rigatoni, kid’s shaped pasta, and 2 different types of Elbow macaroni)
  • Rubbing alcohol
  • Food Coloring
  • Paper towels
  • Craft tray or cookie tray
  • Zipper-close plastic bags


Layer your tray with paper towels. Add 1 Tablespoon of rubbing alcohol and 4-5 drops of desired food coloring to a zipper close plastic bag. Then place your dry pasta into the bag. Close your bag completely. Shake the pasta in the bag and swirl it around until the pasta is completely coated with the food coloring and alcohol mixture. Drop the pasta onto the paper towels to dry. Use a toothpick to spread out the pasta for drying. Repeat with different colors in separate bags. Mix food coloring to make additional colors. Make sure the pasta is completely dry before handling again.


Using Your Colored Pasta With Children


There are endless uses for colored pasta. My kids enjoy making arts and crafts, gluing them, making jewelry, counting, sorting, patterning, building, and making different shapes out of the pasta. Work on fine motors skills when you string and make necklaces and bracelets from the colored pasta. We will use our jewelry when learning more about Native Americans this Thanksgiving season. Colored pasta works wonders in your sensory bins, too. Let the children mix, scoop, and play with them.

Make Crafts and Jewelry


Practice math skills like counting, sorting, and patterning. 


Use in Sensory Bins


Follow these easy steps to make your own colored pasta and use them for all your favorite projects, too! 


Friday, November 8, 2013

My Favorite Banana Nut Bread Recipe


When I got married my sister-in-law gave me a recipe box with some of her favorite recipes. One recipe that she included was her Banana Nut Bread recipe. I tried it and for eight years it has been my go-to recipe for making banana nut bread. If you like to bake you probably have all or most of the ingredients sitting in your pantry already. This is also the recipe I keep handy when I have bananas sitting on my counter for a few days…which happens just about every week. Buying extra bananas is my excuse to indulge in my favorite Banana Nut Bread!

My Favorite Banana Nut Bread Recipe

1 ¾ cups Flour
¼ tsp. Baking Soda
2/3 cup Sugar
2 Eggs
¼ cup Vegetable oil
2 tsp. Baking Powder
½ tsp. salt
¾ cup Milk
1 cup Mashed ripe bananas (about 2 bananas)
½ cup Nuts, chopped (walnuts are great)
½ to 1 tsp. Cinnamon
Pam Nonstick Spray

Grease and dust small loaf pan.  Mix all ingredients.  Bake at 350 degrees for 45 minutes to 1 hour. If you want to make mini-muffins like I often do then bake them for about 12 minutes.


Hope you enjoy this banana nut bread and muffin recipe as much as we do!


Wednesday, November 6, 2013

Turkey Shaped Pancakes


Want to make some fun pancakes for the month of November? Reusable ketchup/mustard squirt bottles are the perfect tools to make the cutest turkey pancakes for your family. (I purchased a set of these bottles at the dollar store.) Use your favorite pancake batter recipe or cheat like me with a store-bought pancake mix. Prepare the pancake batter as directed.

Pour some batter into one of these squeeze bottles. This will help shape the feathers for your turkey. Reserve some batter to make round pancakes, too. (The round pancakes will be for the body of the turkey.)


Squirt some batter from the ketchup bottle directly onto your skillet. Make an oval shape or feather shape outline when you squirt. Fill in the outline with more batter. A measuring cup works well for easy pouring to make the round pancakes. Make some small round pancakes and some medium round pancakes. You will need one small and one medium pancake for each turkey you intend to make. I chose to do the feathers and the body separately because I thought the kids would like to dip the feathers in their syrup. (They did!)


Layer a small round pancake onto a medium round pancake for the body. Put a banana slice on the top round pancake for the head. Arrange the feather shaped pancakes above the body and head. Stick two pretzel sticks below the body to make the legs. I used mini chocolate chips for the eyes, walnut pieces for the beak, and a mini red M&M for the wattle.


Hope your family enjoys these turkey shaped pancakes!


Friday, November 1, 2013

Fall Snack Mix


I am a huge fan of trail mix and other snack mixes. They are simple to throw together and you can modify your snack mixes to fit your cravings or whatever you have in your pantry. I like to make snack mixes when I am planning out snacks for the kids, too. I can toss them into a baggie or container and take them anywhere. They also make fun and tasty gifts.

My children have two wonderful teachers this year so I wanted to make a Fall Snack Mix this week to show my appreciation for them. I ended up making individual baggies to give as treats for their classmates as well.

Here is what I put in this Fall Snack Mix:

  • Autumn candy mix (candy corn, candy pumpkins, etc.)-1 bag
  • Quaker square cereal
  • Stick Pretzels
  • M&M’s (Autumn mix)
  • Cracker Jacks (3 boxes of caramel popcorn and peanuts mix)
  • Cheerios (for the kids' bags)


I purchased some mason jars (any airtight container is fine) so the snack mix could stay fresh. I used a hot glue gun to add some ribbon and bow around the lid. I then traced a circle out of cardstock and glued it to the top. I personalized each jar with the teacher's name spelled out in cute stickers. Here is a tasty treat and cute gift to share!


Wednesday, October 30, 2013

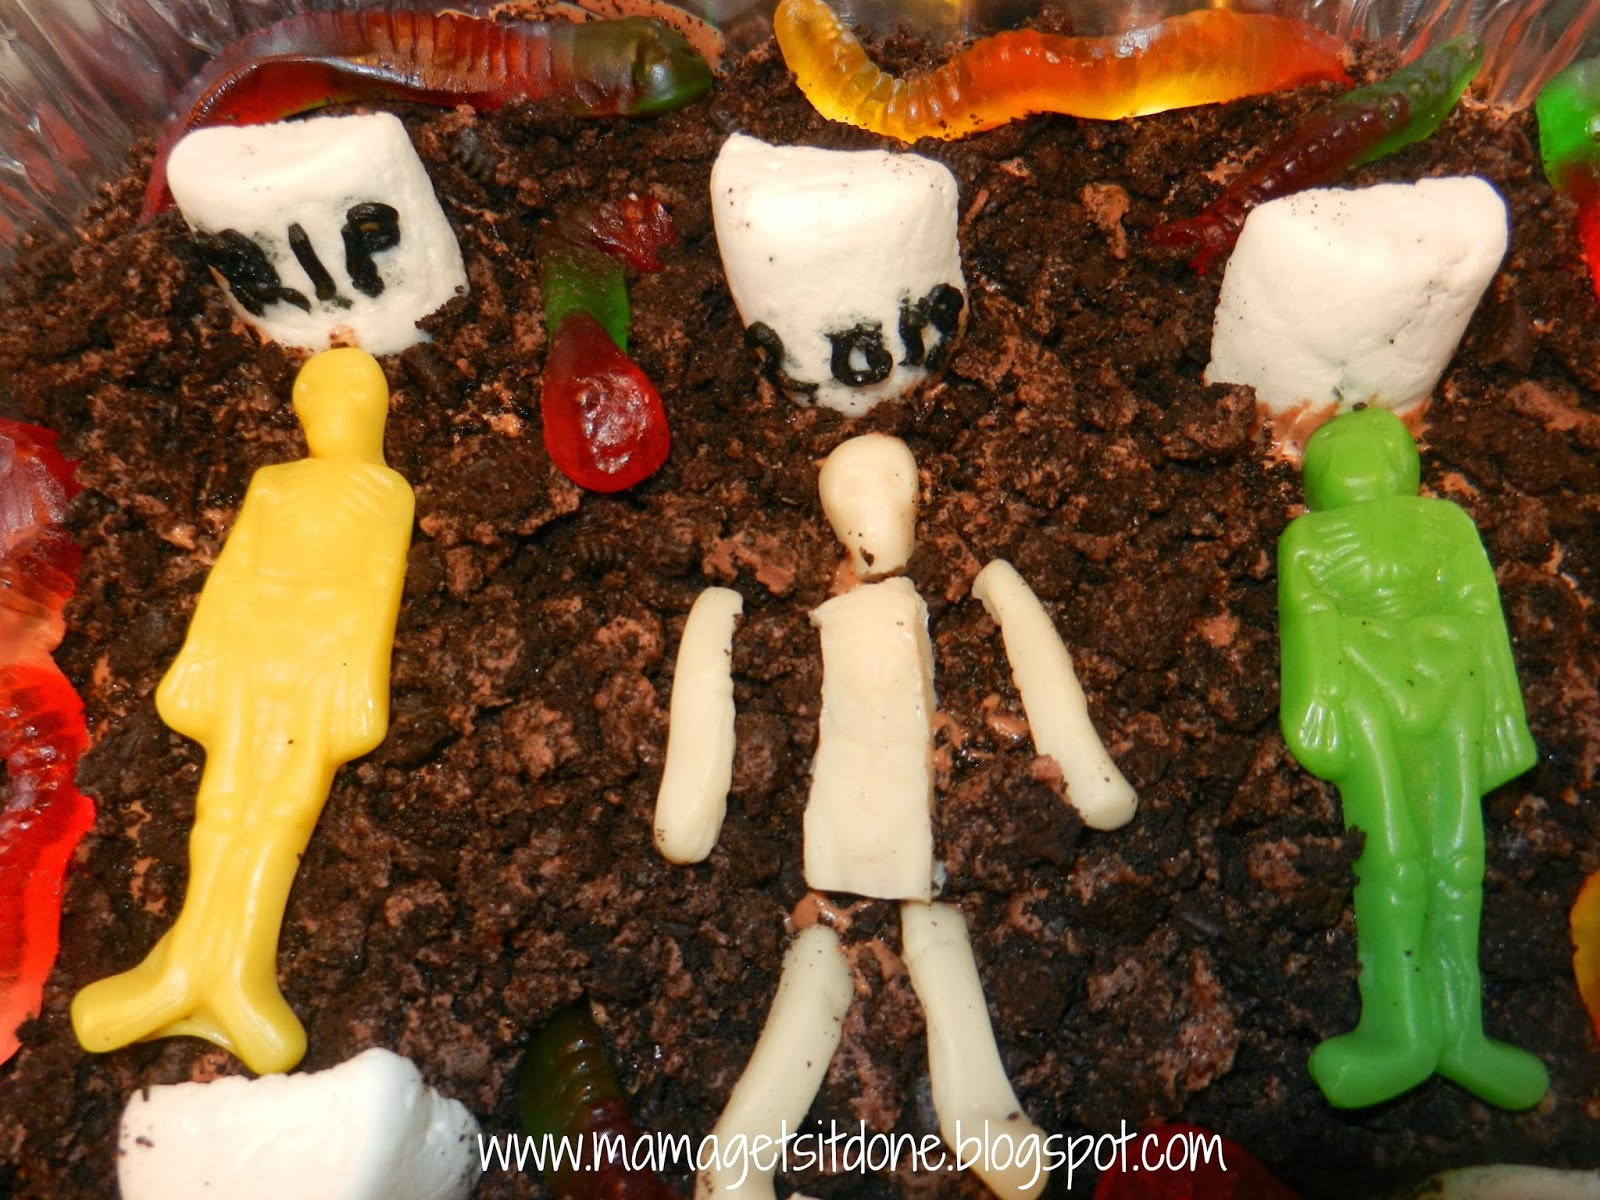
Oreo Pudding Graveyard


Oreo pudding cups were always a favorite of mine when I was growing up. Nothing beats eating “dirt and worms” as a kid! Of course, I had to make it for my daughter's Halloween party for girl scouts. The original recipe that inspired my dessert can be found at http://www.kraftrecipes.com/recipes/dirt-cups-57763.aspx. I didn’t make individual cups because I wanted it to look more like a graveyard to go with the Halloween theme. This is how I made my dirt filled graveyard:

Ingredients
  • Jell-o Chocolate instant pudding and pie-filling (5.9 oz)
  • Milk (3 cups)
  • Cool-Whip, thawed (8 oz. Tub)
  • Oreos (about 15 to 20 Chocolate crème cookies), crushed and divided
  • Marshmallows (large)
  • Gummy worms and gummy skeletons
  • Black tube icing

Directions
1. Place cookies in a Ziploc bag. I used a meat mallet to crush the oreos in the baggie until they were finely crushed into crumbs.
2. Whisk pudding mix and milk together for two minutes. Let stand 5 minutes. Mix about ½ cup of crushed cookies into the Cool-Whip. Then add this cookie/Cool-Whip mixture to the pudding.
3. Pour pudding into a square or rectangular serving dish.
4. Sprinkle the remainder of crushed cookies over the pudding mixture.
5. Add tombstones, gummy skeletons and gummy worms to your “dirt” to make a graveyard scene.

The tombstones are marshmallows cut in half from top to bottom. I piped “R.I.P” in black icing on a couple of them. I added gummy worms to creep around the graveyard and skeleton gummies. I cut up one of the skeleton gummies so it could appear to have bones peeking out of the dirt.


Thursday, October 24, 2013

Halloween Block Party


I showed you the cute Halloween cupcakes that I made for our neighborhood’s first ever Halloween block party. Our neighborhood is brand new so this is a lot of people’s first year celebrating Halloween in the area. The awesome thing about our neighborhood is everyone is super friendly and there are tons of kids around here!
Our first step in planning the party was to make invitations. I made a quick invite on picmonkey.com. Then two weeks prior to the party a neighbor and I went door-to-door and hand delivered the invites. We also had a sign up sheet for food and party supplies for anyone that wanted to participate.

(We also included our contact information, location, and a reminder to wear their costumes!)

The Halloween block party was so much fun! The cupcakes that I made were used for our “Cupcake Walk.” (If you missed the Halloween decorated cupcakes you can see them here.) I taped pumpkin die-cuts onto our neighbor’s driveway. Then, I set up the numbered pumpkins in a circle and the kids walked around while music played in the background. When the music stopped I chose a number from a bucket and that child won a cupcake.


One of my neighbors set up a table for face painting and I set up to apply Halloween tattoos on the kids’ hands. I had purchased a bag of Skull Tattoo boxes at Wal-Mart. These individual boxes are meant for trick-or-treating and goody bag treats, but they were just right for this occasion!


Later, a neighbor set up chairs and some of the kids played musical chairs. It was so funny to watch how competitive they became when they ran to grab a seat. Another neighbor purchased glow sticks, and the kids had fun waving them around and dancing with them when it got darker. This was such a great idea and it kept the kids entertained!


I was so busy with all the kid’s activities and games that I failed to take more pictures. Most of them were taken with my cell phone because we were running around so much. We had a beautiful spread of yummy food and desserts, but no pictures to show for it. Oh, well! We had hotdogs, frito pies, veggie trays, fruit trays, and so much more! It was great having all those planned activities, but I think everyone had a great time just hanging out, playing, and getting to know all the neighbors!


Our neighborhood had our first Halloween block party and it was a total success! I think everyone agreed that we would be making this an annual neighborhood event!

Wednesday, October 23, 2013

Halloween Cupcakes


This past weekend I made some delicious and fun Halloween cupcakes for our neighborhood block party. (More to come on that later!) We used them for our cupcake walk so I wanted to create a variety of cupcakes that the children could pick from for their prize. I think they were a success because all the kids took their time to choose their favorite decorated cupcake.

My main decorating ingredients were mini M&M's and tubed black gel icing. I think I used those two items on almost every cupcake. I used a tub of cream cheese flavored icing, but I added food coloring to make green and orange icing for some of the cupcakes.


Mummies- I made mummies by piping "wraps" with my white tubed icing. In the middle of the wrapping I added yellow M&M's and piped black gel in the center of the M&M's for eyes.

Jack-o-Lanterns- I made Jack-O-Lanterns with M&M eyes and a leaf. Then I piped a jack-o-lantern face with the black gel icing.

Frankenstein- To make the Frankenstein cupcakes I made squiggly hair and a mouth with the black gel.

Spiders- The Spider cupcakes were made with an oreo, M&M's, and black gel icing for the legs.

Monster- A favorite cupcake was the monster with many eyes. I used red or green M&M eyes with black gel in the middle.

Witch- I also made a Witch's hat cupcake to match my daughter's costume. It had an Oreo cookie with a Hershey kiss on top and black icing around the Hershey kiss.

Ghosts- To make simple ghosts I left the cupcakes white and added eyes.

You can be so creative when making Halloween cupcakes, and I can't wait to create more!