Wednesday, October 30, 2013

Oreo Pudding Graveyard


Oreo pudding cups were always a favorite of mine when I was growing up. Nothing beats eating “dirt and worms” as a kid! Of course, I had to make it for my daughter's Halloween party for girl scouts. The original recipe that inspired my dessert can be found at http://www.kraftrecipes.com/recipes/dirt-cups-57763.aspx. I didn’t make individual cups because I wanted it to look more like a graveyard to go with the Halloween theme. This is how I made my dirt filled graveyard:

Ingredients
  • Jell-o Chocolate instant pudding and pie-filling (5.9 oz)
  • Milk (3 cups)
  • Cool-Whip, thawed (8 oz. Tub)
  • Oreos (about 15 to 20 Chocolate crème cookies), crushed and divided
  • Marshmallows (large)
  • Gummy worms and gummy skeletons
  • Black tube icing

Directions
1. Place cookies in a Ziploc bag. I used a meat mallet to crush the oreos in the baggie until they were finely crushed into crumbs.
2. Whisk pudding mix and milk together for two minutes. Let stand 5 minutes. Mix about ½ cup of crushed cookies into the Cool-Whip. Then add this cookie/Cool-Whip mixture to the pudding.
3. Pour pudding into a square or rectangular serving dish.
4. Sprinkle the remainder of crushed cookies over the pudding mixture.
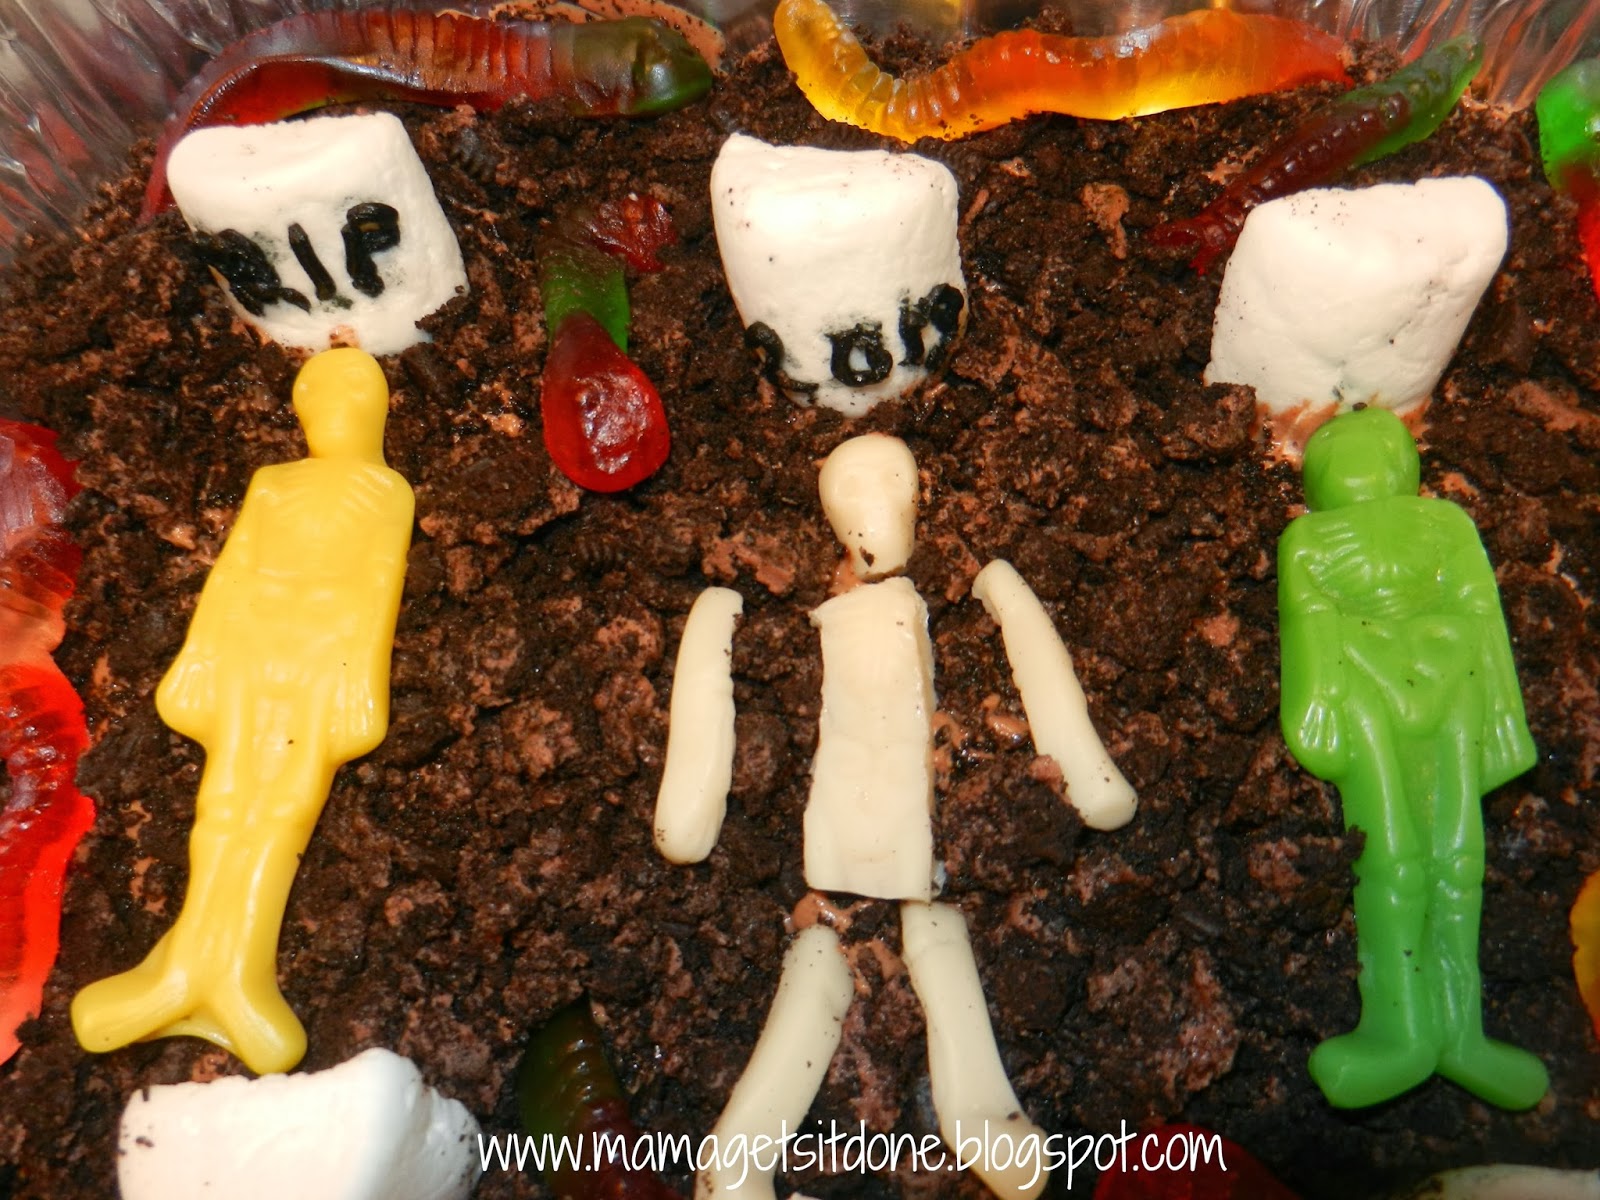
5. Add tombstones, gummy skeletons and gummy worms to your “dirt” to make a graveyard scene.

The tombstones are marshmallows cut in half from top to bottom. I piped “R.I.P” in black icing on a couple of them. I added gummy worms to creep around the graveyard and skeleton gummies. I cut up one of the skeleton gummies so it could appear to have bones peeking out of the dirt.


Thursday, October 24, 2013

Halloween Block Party


I showed you the cute Halloween cupcakes that I made for our neighborhood’s first ever Halloween block party. Our neighborhood is brand new so this is a lot of people’s first year celebrating Halloween in the area. The awesome thing about our neighborhood is everyone is super friendly and there are tons of kids around here!
Our first step in planning the party was to make invitations. I made a quick invite on picmonkey.com. Then two weeks prior to the party a neighbor and I went door-to-door and hand delivered the invites. We also had a sign up sheet for food and party supplies for anyone that wanted to participate.

(We also included our contact information, location, and a reminder to wear their costumes!)

The Halloween block party was so much fun! The cupcakes that I made were used for our “Cupcake Walk.” (If you missed the Halloween decorated cupcakes you can see them here.) I taped pumpkin die-cuts onto our neighbor’s driveway. Then, I set up the numbered pumpkins in a circle and the kids walked around while music played in the background. When the music stopped I chose a number from a bucket and that child won a cupcake.


One of my neighbors set up a table for face painting and I set up to apply Halloween tattoos on the kids’ hands. I had purchased a bag of Skull Tattoo boxes at Wal-Mart. These individual boxes are meant for trick-or-treating and goody bag treats, but they were just right for this occasion!


Later, a neighbor set up chairs and some of the kids played musical chairs. It was so funny to watch how competitive they became when they ran to grab a seat. Another neighbor purchased glow sticks, and the kids had fun waving them around and dancing with them when it got darker. This was such a great idea and it kept the kids entertained!


I was so busy with all the kid’s activities and games that I failed to take more pictures. Most of them were taken with my cell phone because we were running around so much. We had a beautiful spread of yummy food and desserts, but no pictures to show for it. Oh, well! We had hotdogs, frito pies, veggie trays, fruit trays, and so much more! It was great having all those planned activities, but I think everyone had a great time just hanging out, playing, and getting to know all the neighbors!


Our neighborhood had our first Halloween block party and it was a total success! I think everyone agreed that we would be making this an annual neighborhood event!

Wednesday, October 23, 2013

Halloween Cupcakes


This past weekend I made some delicious and fun Halloween cupcakes for our neighborhood block party. (More to come on that later!) We used them for our cupcake walk so I wanted to create a variety of cupcakes that the children could pick from for their prize. I think they were a success because all the kids took their time to choose their favorite decorated cupcake.

My main decorating ingredients were mini M&M's and tubed black gel icing. I think I used those two items on almost every cupcake. I used a tub of cream cheese flavored icing, but I added food coloring to make green and orange icing for some of the cupcakes.


Mummies- I made mummies by piping "wraps" with my white tubed icing. In the middle of the wrapping I added yellow M&M's and piped black gel in the center of the M&M's for eyes.

Jack-o-Lanterns- I made Jack-O-Lanterns with M&M eyes and a leaf. Then I piped a jack-o-lantern face with the black gel icing.

Frankenstein- To make the Frankenstein cupcakes I made squiggly hair and a mouth with the black gel.

Spiders- The Spider cupcakes were made with an oreo, M&M's, and black gel icing for the legs.

Monster- A favorite cupcake was the monster with many eyes. I used red or green M&M eyes with black gel in the middle.

Witch- I also made a Witch's hat cupcake to match my daughter's costume. It had an Oreo cookie with a Hershey kiss on top and black icing around the Hershey kiss.

Ghosts- To make simple ghosts I left the cupcakes white and added eyes.

You can be so creative when making Halloween cupcakes, and I can't wait to create more!


Monday, October 21, 2013

K5 Learning Trial

K5 Learning has an online reading and math program for kindergarten to grade 5 students. I've been given a 6 week free trial to test and write a review of their program. If you are a blogger, you may want to check out their open invitation to write an online learning review of their program.

Friday, October 18, 2013

Stamping Apple and Pumpkin Prints


We added apple and pumpkin books to our family’s browsing basket recently. I set up a painting art activity to go along with these books. We stamped apples and pumpkins using real apples, red paint, and orange paint.

To do this craft you only need a few simple supplies.

  • Apple (sliced in half from top to bottom)
  • Red and orange paint (tempera or acrylic paint)
  • Paper plate (for paint and dipping)
  • Paint brush (optional)
  • Thick paper
  • Glue
  • Newspaper (to keep the table clean)
  • Twigs from outside (optional)


Dip your halved apple into red paint and stamp an apple print directly onto the paper. (To better coat the apple you can use your paintbrush to apply paint directly to the apple instead of dipping the apple in the paint.) Dip your other half in the orange paint to make a pumpkin shape. Add a little glue and stick your twig to the top of each print to make apple and pumpkin stems.


 Let it dry completely. Hang your child’s apple and pumpkin prints up for all to see!


Wednesday, October 16, 2013

Chore Chart and Reward Coupons


One way that we try to promote responsibility and to get our children involved in helping around the house is to have a hanging chore chart. We also like to have a reward system in place. My children are young so they do chores that they are capable of doing on their own. For example, they may be asked to set the table, clean their room, or make their bed. I try not to put too much pressure on them to finish their chores because I want them to learn to be responsible. Instead I try using positive reinforcement with praise and a reward system.


I purchased this wooden, magnetic chore chart from Bed, Bath, and Beyond, and I have truly been happy with it. It has a variety of magnetic rectangles with a certain chore written and pictured on it. In addition to the chores there are magnets to help improve behaviors like "Say Please and Thank You." The chart also includes circle smiley faces with words of encouragement like “You did it!” There are two blank ones that you can write on, too. I am thinking about making some of my own chore magnets to add to the collection.


 The actual chart was probably meant for one child, but it has enough space and chore magnets to work for all three of my children. Right now the older children have 3 chores and my youngest has just one. You can assign fewer or more chores for your children. We change out the chores each week. I usually let them choose at least one that they want to do for that week. Once they complete a chore they can add a smiley magnet for that day.

We do have busy days when a couple or all the chores are left undone. Again, I don’t stress over it. Sometimes they initiate extra chores to “make-up” missed ones all by themselves. We also take Sundays off from chores.

Often my son will help my husband with outdoor chores or he will go the extra mile in cleaning. When he does this my husband or I will let him knock off a chore for the following day to show our appreciation.


I made these reward coupons that the children can work towards earning at the end of the week. Printable reward coupons will be below...Just download and print!

Kid's Reward Coupons Printable (Page 1)
Kid's Reward Coupons Printable (Page 2)

 Reward coupons, allowances, special treats, or doing something fun on the weekend are different ways that we reward the children and encourage them to do their weekly chores. How do you encourage your own children to complete their chores?


Friday, October 11, 2013

Halloween Lunch Ideas


I love making cute lunches for the month of October! There are so many ways to dress up your kid’s lunches during this time! Think of the various themes like Halloween, ghosts, pumpkins, Fall, monsters, jack-o-lanterns, mummies, bats, owls, etc.

Jack-o-Lanterns


Saw this on pintrest! I used a mandarin orange fruit cup and added a face with a sharpie to make a jack-o-lantern. So Easy!


Mummies

Wrap a hotdog wienie or sausage in a crescent roll and bake according to package. Add some eyes with food bits, mustard, candy, or icing and you have yourself a mummy!


Wrap your drink or treat in gauze and add googly eyes to dress it up as a mummy. Layer strips of sliced mozarella cheese on a sandwich to make a mummy face.

Ghosts

Shape your crescent roll dough into a ghost and add eyes.


Bats

I found a bat sandwich cutter a couple of years ago and...Ta-da!


Stickers & Picks

Add Halloween stickers to notes, baggies, and fruit. Put a toothpick in between two stickers that are back to back and you have your own pick to hold cheese, fruit, cubed ham, etc.

Use Halloween themed picks or cupcake toppers like the one below to make fruit kabobs or to make fruit and cheese sticks.


Halloween Treats

I try not to put candy or load their lunches with sugary sweets, but I do like to treat the kids every now and then to something special. I made these sugar cookies using my Pampered Chef set of mini cookie cutters. The leaf and pumpkin cutters are great for these cookies, but I also use them to cut sliced cheese into fun shapes.


It's so much fun to make Halloween bento lunches. So get out your cute cookie cutters, Halloween stickers, and use a little imagination to make lunch a little sweeter! Your kids will thank you!!

Wednesday, October 9, 2013

Make a T-Shirt Painting Smock


My older daughter’s Girl Scout troop did a painting session led by a local art instructor yesterday. Our troop leader told the girls to wear an old T-shirt so they would not get paint all over their clothes. I had wanted to make a smock of some kind for awhile now so I decided to repurpose an old T-shirt of mine. I needed something easy and fast, too.

I looked through my embarrassingly large collection of old t-shirts and found an old white one with an art picture on it. I was willing to part with it for this project. I turned the shirt over and simply cut a straight line from the bottom all the way up through the collar. I then sewed a seam along each side of where I cut. (This part could have been skipped, but I wanted a little bit of a finished look.) I don’t have a serger so I just used my sewing machine to sew two straight seams.


I cut four 16-inch pieces of grosgrain ribbon (7/8 inch). I sewed two of the ribbons under the collar on each side of the cut. Then I sewed the other two ribbons a little further down the back of the shirt. I made sure to line them up facing each other so that I could tie them together later.


I was finished!


My 3 year-old was the model while her older sister was at school. There was not much to it, and I think it served its purpose. Now the girls can use their T-shirt smocks for everyday painting projects.


Our girl scout troop had a blast painting, and Ididn't have to worry about paint spills!


Friday, October 4, 2013

Fall Wreath and Fall Mantel Decorations


I made a wreath and decorated my mantel for Fall this past weekend. I am so excited that I get to cross off two more things from my Fall Bucket list. I love decorating for the holidays! I started by making a big, fluffy wreath from mesh ribbon and a metal wreath frame. I chose a seasonal ribbon with maroon, orange, gold, and yellow colors. Then I weaved in a brown colored mesh ribbon on top of it. This was my first attempt at making one of these mesh wreaths and I was surprised at how easily and quickly I made the wreath. I purchased some pumpkin and Autumn themed picks and stuck them through the ribbon.  I was so pleased with the results that I decided to make an additional one for my mom’s birthday yesterday.


We got “booed” by our neighbors this week and they had placed a wooden Halloween sign in our bucket of goodies.  I added it to my new project and our Fall wreath became a Halloween wreath. When Halloween is over I can just remove the sign from the wreath hanger.


For my mantel, I added a garland of Fall leaves, pumpkin and seasonal picks, a couple of scarecrows, and my four ceramic pumpkins. I also put a bunch of leaves and some picks in a brown and black wooden box. I still would like to add some more height and maybe a sign or other centerpiece for the background.


Wednesday, October 2, 2013

Organized Kitchen Drawers

An organized kitchen drawer makes life so much easier! About 7 months ago we moved into our custom-built home. We were fortunate enough to design exactly how we wanted everything. One thing I requested was a lot of kitchen drawers. Deep drawers. This has made all the difference! I am no longer sticking my head into cabinets and reaching to the very back for a missing appliance or lost dish.

There are three favorite drawers in my kitchen that get used daily so I made sure to organize them right away. The top drawer holds my sandwich cutters, a few favorite cookie cutters, baking cups, and other fun tools for making lunches. It is so much easier to grab what I need in the morning or night before when prepping lunches. The next drawer is home to most of the kid’s lunch containers, thermoses, and bento boxes. The third drawer is the "kid’s drawer." This drawer is devoted to my kids and their abundance of plates, bowls, and cups. I used colored baskets to divide the dishes up so you can grab what you need quickly. If you do not have a kid’s drawer or cabinet yet then make one for them...now! This is a must for encouraging children to be more independent and self-sufficient. My kids get up in the morning, grab a bowl, and pour their cereal all on their own. My husband, children, and I know where everything goes so it makes putting away dishes or setting the table a breeze, too.

Drawer for Bento and Lunch Tools


Drawer for Lunch Containers


Kid's Drawer


My challenge to you (if you haven't already done so) is to organize your kitchen drawers and make them  work for you! Remember to not let yourself get overwhelmed. Organize one drawer at a time, and go from there!